Ruby is an object-oriented programming language developed by Yukihiro Matsumoto. Ruby is a dynamic programming language with a complex but at the same time expressive grammar. Ruby also has a core class library with a rich and powerful API.
Ruby is inspired by other low level and object oriented programming languages like Lisp, Smalltalk, and Perl and uses syntax that is easy for C and Java programmers to learn.
Ruby, a dynamic and open source programming language with a focus on simplicity and productivity, has an elegant syntax that is natural to read and easy to write.
Although it’s easy to program in Ruby, it is not a simple language.
Applications
1. Web Applications
Thanks to Rails and its numerous gems (libraries), Ruby is a good choice to create all kinds of web apps. It’s easy to use, coding with it is extremely fast, and it offers reliable features that have already been tried and tested.
As long as your web app isn’t expecting millions of simultaneous users, Ruby is great for this, especially if you’re a startup on a budget.
2. E-Commerce
Did you know that Shopify uses Ruby on Rails for its infrastructure?
This happens for a reason: Ruby has lots of gems developed Precisely for e-commerce.
In other words, if you’re building an online shop and want to have it up and running in the least possible time, then contact your Ruby development outsourcing company because the language has it all – help desks, payment gateways, email campaign platforms, and more.
3. Content Management
If you’re planning to create a content-centric website, then Ruby has your back.
Thanks to its numerous libraries, you can build a site with ready-to-use features not just for creating content but also for sharing and distributing it among your audience.
Additionally, there are several SEO features for you to power up your content with the best practices for ranking on search engines.
4. Custom Database Solutions
Again, Ruby on Rails comes to your aid. That’s because this framework uses ActiveRecord, which allows for easy database management without needing SQL.
It also integrates itself with Database Management Systems that gives you the possibility to manage complex databases.
5. Prototyping
As we said above, Ruby is perfect to create test versions before working on a fully-fledged application.
Since it’s so easy to use, you can create a basic structure in no time to check if your design is feasible.
It also allows you to work on an early sketch that you can show to the rest of the team for them to see what you want the final software to look like.
Ruby Offers Flexibility, Speed, and Efficiency for All Kinds of Projects
Since Ruby is a scripted server-side language, it can be used to help applications through different operations, even when the apps were created with other languages. Thus, Ruby developers use the language to create command-line utilities, helpers, and Common Gateway Interface (CGI) scripts.
Besides, Ruby is easy to read, follow, and interpret, which boosts the collaboration between the development teams that are using it. That’s because the way Ruby code is written, it allows anyone to take a look at it and understand the basic operation of what’s being programmed. Naturally, this is an advantage more noticeable for developers, since they can check if the direction used for the project is the right one.
Finally, it’s worth noting that Ruby, as an object-oriented language with a scripting syntax, is perfect to create backend scripts that are flexible enough to work with solutions coded in any language. All of that makes it perfect for certain project types, even against all the critics that say Ruby is dead.
Because, let’s face it, a language so easy to use, with that many libraries, and that’sy constantly being updated is far from being dead and farther from being useless.
Ruby on Rails – Installation
To develop a web application using Ruby on Rails Framework, you need to install the following software −
- Ruby
- The Rails Framework
- A Web Server
- A Database System
We assume that you already have installed a Web Server and a Database System on your computer. You can use the WEBrick Web Server, which comes with Ruby. Most websites however use Apache or lightTPD web servers in production.
Rails works with many database systems, including MySQL, PostgreSQL, SQLite, Oracle, DB2 and SQL Server. Please refer to a corresponding Database System Setup manual to set up your database.
Let’s look at the installation instructions for Rails on Windows and Linux.
Rails Installation on Windows
Follow the steps given below for installing Ruby on Rails.
Step 1: Check Ruby Version
First, check if you already have Ruby installed. Open the command prompt and type ruby -v. If Ruby responds, and if it shows a version number at or above 2.2.2, then type gem –version. If you don’t get an error, skip Install Ruby step. Otherwise, we’ll install a fresh Ruby.
Step 2: Install Ruby
If Ruby is not installed, then download an installation package from rubyinstaller.org. Follow the download link, and run the resulting installer. This is an exe file rubyinstaller-2.2.2.x.exe and will be installed in a single click. It’s a very small package, and you’ll get RubyGems as well along with this package. Please check the Release Notes for more detail.

Step 3: Install Rails
Install Rails − With Rubygems loaded, you can install all of Rails and its dependencies using the following command through the command line −
C:\> gem install rails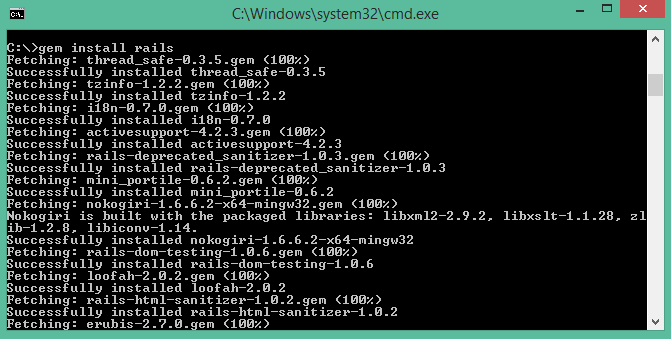
Note − The above command may take some time to install all dependencies. Make sure you are connected to the internet while installing gems dependencies.
Step 4: Check Rails Version
Use the following command to check the rails version.
C:\> rails -vOutput
Rails 4.2.4Congratulations! You are now on Rails over Windows.
Rails Installation on Linux
We are installing Ruby On Rails on Linux using rbenv. It is a lightweight Ruby Version Management Tool. The rbenv provides an easy installation procedure to manage various versions of Ruby, and a solid environment for developing Ruby on Rails applications.
Follow the steps given below to install Ruby on Rails using rbenv tool.
Step 1: Install Prerequisite Dependencies
First of all, we have to install git – core and some ruby dependences that help to install Ruby on Rails. Use the following command for installing Rails dependencies using yum.
tp> sudo yum install -y git-core zlib zlib-devel gcc-c++ patch readline readline-devel libyaml-devel libffi-devel openssl-devel make bzip2 autoconf automake libtool bison curl sqlite-develStep 2: Install rbenv
Now we will install rbenv and set the appropriate environment variables. Use the following set of commands to get rbenv for git repository.
tp> git clone git://github.com/sstephenson/rbenv.git .rbenv
tp> echo 'export PATH = "$HOME/.rbenv/bin:$PATH"' >> ~/.bash_profile
tp> echo 'eval "$(rbenv init -)"' >> ~/.bash_profile
tp> exec $SHELL

tp> git clone git://github.com/sstephenson/ruby-build.git ~/.rbenv/plugins/ruby-build
tp> echo 'export PATH = "$HOME/.rbenv/plugins/ruby-build/bin:$PATH"' << ~/.bash_profile
tp> exec $SHELL
Step 3: Install Ruby
Before installing Ruby, determine which version of Ruby you want to install. We will install Ruby 2.2.3. Use the following command for installing Ruby.
tp> rbenv install -v 2.2.3Use the following command for setting up the current Ruby version as default.
tp> ruby -vOutput
ruby 2.2.3p173 (2015-08-18 revivion 51636) [X86_64-linux]Ruby provides a keyword gem for installing the supported dependencies; we call them gems. If you don’t want to install the documentation for Ruby-gems, then use the following command.
echo "gem: --no-document" > ~/.gemrcThereafter, it is better to install the Bundler gem, because it helps to manage your application dependencies. Use the following command to install bundler gem.
tp> gem install bundlerStep 4: Install Rails
Use the following command for installing Rails version 4.2.4.
tp> install rails -v 4.2.4Use the following command to make Rails executable available.
tp> rbenv rehashUse the following command for checking the rails version.
tp> rails -vOutput
tp> Rails 4.2.4Ruby on Rails framework requires JavaScript Runtime Environment (Node.js) to manage the features of Rails. Next, we will see how we can use Node.js to manage Asset Pipeline which is a Rails feature.
Step 5: Install JavaScript Runtime
Let us install Node.js from the Yum repository. We will take Node.js from EPEL yum repository. Use the following command to add the EPEL package to the yum repository.
tp> sudo yum -y install epel-releaseUse the following command for installing the Node.js package.
tp> sudo yum install nodejsCongratulations! You are now on Rails over Linux.
Step 6: Install Database
By default, Rails uses sqlite3, but you may want to install MySQL, PostgreSQL, or other RDBMS. This is optional; if you have the database installed, then you may skip this step and it is not mandatory that you have a database installed to start the rails server. For this tutorial, we are using PostgreSQL database. Therefore use the following commands to install PostgreSQL.
tp> sudo yum install postgresql-server postgresql-contribAccept the prompt, by responding with a y. Use the following command to create a PostgreSQl database cluster.
tp> sudo postgresql-setup initdbUse the following command to start and enable PostgreSQL
tp> sudo systemctl start postgresql
tp> sudo systemctl enable postgresql
Keeping Rails Up-to-Date
Assuming you have installed Rails using RubyGems, keeping it up-to-date is relatively easy. We can use the same command in both Windows and Linux platform. Use the following command −
tp> gem update railsOutput
The following screenshot shows a Windows command prompt. The Linux terminal also provides the same output.
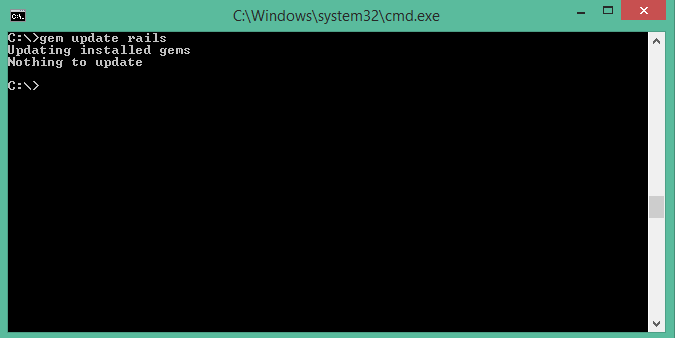
This will automatically update your Rails installation. The next time you restart your application, it will pick up this latest version of Rails. While using this command, make sure you are connected to the internet.
Installation Verification
You can verify if everything is set up according to your requirements or not. Use the following command to create a demo project.
tp> rails new demoOutput
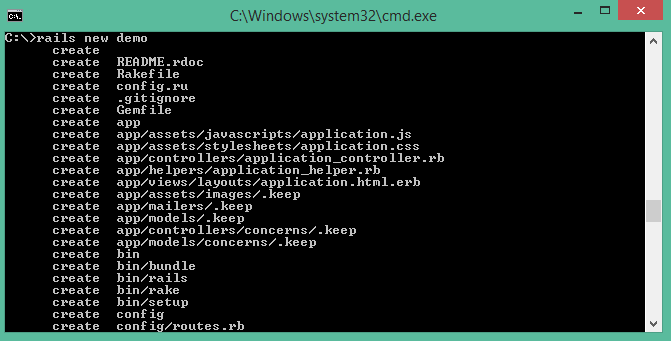
It will generate a demo rail project; we will discuss about it later. Currently we have to check if the environment is set up or not. Next, use the following command to run WEBrick web server on your machine.
tp> cd demo
tp> rails server
It will generate auto-code to start the server

Now open your browser and type the following −
http://localhost:3000It should display a message, something like, “Welcome aboard” or “Congratulations”.
ruby install in windows tutorial
